(cross-posted from my Ravelry group)
In the coming weeks, I’ll be ready to start testing a few new patterns, and I’m going to have a go at something a little different. I have been testing in the Free Pattern Testers group, which has been great, but I think I’ve gotten to the point where I’m ready to start tests in my own Ravelry group.
So I’m going to give pattern testing a go in this group. If it doesn’t work out, I won’t hesitate to move it back over to Free Pattern Testers, but I thought it might be worth a try! The same basic structure and rules will apply, most importantly: please don’t sign up for a test if you don’t have time for it. If you’re unable to finish by the deadline (without good reason), I will not be able to accept you for further tests. If many people are finding it hard to finish on time, I will extend the deadline.
HOW IT WILL WORK
I will post a new thread in this group titled “TEST KNIT: Pattern Name (Project Type)” with pictures, pattern details (sizes, gauge, required materials) and testing requirements (number of testers needed, deadline date, etc). I'll announce on Twitter, blog, etc. when a new test knit is ready to sign up to.
Please post in the thread that you’re interested (this is for other members’ reference), and pm me your e-mail address to get started. I will only have limited places, so once I have everyone I need, I will close the thread to further sign-ups.
Once enough people have expressed interest, I will send out the pattern (for free, of course!) to everyone who I have accepted to test (note: almost everyone will be accepted; the only reasons I would decline are if there is a history of not finishing tests or I don’t feel your skill level is quite there yet). You can always use whatever yarn you would like, depending on whether or not it’s appropriate for the pattern.
I’ll earburn anyone who hasn’t posted in a while (say every week or two), just to check up on how you’re doing. I encourage everyone to post progress reports/pics/comments/or just chat in the thread.
Please let me know when you’re done and I’ll mark you as finished, and let me have a link to the project in your notebook. And I love to see pictures!
I think that’s it. Please let me know if you have any questions!

Ashley Knowlton, Author and Knitwear Designer
Saturday, 18 February 2012


Saturday, 11 February 2012
Darlington, Revisited
This time of year always makes me thankful for my wellies (also called, depending on where you're from, rain boots, gumboots, galoshes, and, I'm sure, a host of other names!). I live in the countryside in the south of England, where wellington boots are worn with the same devotion with which Pacific Northwesterners wear socks with sandals year round. And as any Briton knows, wellies don't fit correctly without the proper knitwear.


So Darlington was born, partly out of necessity, partly out of my love of cables. Inspired by welly socks with their long, fold-over cuffs (the sample is even knit in a colour similar to Hunter red) and over-the-trouser fit, I wanted a sock that would stretch to fit over my jeans (they stay up better that way) and make wellies warmer and more comfortable. And I just thought that I had to share these with the world.


Kate at Twist Collective loved the idea, too, and worked with me to create an ornate pair of stockings that look even better outside the boot. Ribbing ensures a good, close fit around the foot and keeps them from sliding down, while a pretty cable winds up to the cuff, with a matching medallion at the calf. Toe-up construction makes it easy to customise the fit and sport-weight yarn makes them knit up very fast. I loved the sample, which meant that right after I made it (sadly, what with my monstrous calves, they don't fit me), I knew I had to make my own pair.

My own handspun pair have been my constant companions during this long, cold and damp English winter, and have found their own place, nestled inside my wellington boots by the doorway. I'm sure they will keep me company right into English summertime.
You can find Darlington in the Winter 2011 issue of Twist Collective, and for sale in their shop.


So Darlington was born, partly out of necessity, partly out of my love of cables. Inspired by welly socks with their long, fold-over cuffs (the sample is even knit in a colour similar to Hunter red) and over-the-trouser fit, I wanted a sock that would stretch to fit over my jeans (they stay up better that way) and make wellies warmer and more comfortable. And I just thought that I had to share these with the world.


Kate at Twist Collective loved the idea, too, and worked with me to create an ornate pair of stockings that look even better outside the boot. Ribbing ensures a good, close fit around the foot and keeps them from sliding down, while a pretty cable winds up to the cuff, with a matching medallion at the calf. Toe-up construction makes it easy to customise the fit and sport-weight yarn makes them knit up very fast. I loved the sample, which meant that right after I made it (sadly, what with my monstrous calves, they don't fit me), I knew I had to make my own pair.

My own handspun pair have been my constant companions during this long, cold and damp English winter, and have found their own place, nestled inside my wellington boots by the doorway. I'm sure they will keep me company right into English summertime.
You can find Darlington in the Winter 2011 issue of Twist Collective, and for sale in their shop.
Wednesday, 1 February 2012
New Pattern: Old Bones
I'm starting a new part-time job (um, making sweets) in a little while, so I'm full steam ahead in getting more new patterns out while I can! And while my samples still fit me...
Say hello to my new aran-weight small shawl pattern, Old Bones:


Old Bones is super cozy, warm, enveloping, and quick to knit. I've been living in it since blocking. The pattern is available both fully charted and with full written instructions. Go check it out and buy from Ravelry!
Say hello to my new aran-weight small shawl pattern, Old Bones:


Old Bones is super cozy, warm, enveloping, and quick to knit. I've been living in it since blocking. The pattern is available both fully charted and with full written instructions. Go check it out and buy from Ravelry!
Friday, 13 January 2012
Stippers and Alyn
Making up for lost time!
Over the holidays, I was able to release two new patterns:
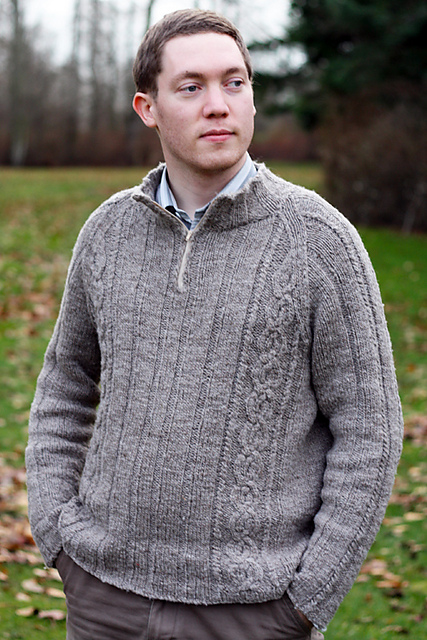
 Alyn is completely handspun from three-ply oatmeal Blue-faced Leicester. I love this fibre. It makes for a soft but hard-wearing men's sweater, with ribbing, cables, and a half-zip collar. My husband almost never takes it off. And, since it was released in Knitty, the pattern is free!
And just a few weeks old but already one of my most popular patterns: Stippers

The pattern name is turning heads (they're named for my husband's sweet, dyslexic habit of crossing his "L"s - I'm fully aware that the name may be eye-catching for different reasons!), but so is their clever seamless construction, arch shaping, continuous braided cable, and the fact that they're not felted. I wear mine every day. I'm going to need to make another pair soon - besides, they only take a few hours to make. The sample is made in soft, sturdy and bulky Quince and Co. Puffin.
Over the holidays, I was able to release two new patterns:
And just a few weeks old but already one of my most popular patterns: Stippers
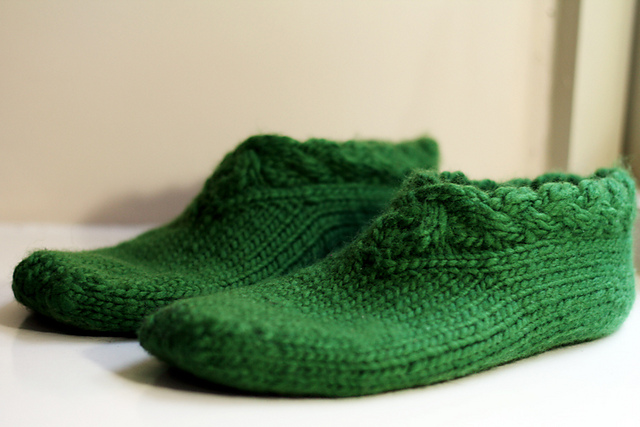
The pattern name is turning heads (they're named for my husband's sweet, dyslexic habit of crossing his "L"s - I'm fully aware that the name may be eye-catching for different reasons!), but so is their clever seamless construction, arch shaping, continuous braided cable, and the fact that they're not felted. I wear mine every day. I'm going to need to make another pair soon - besides, they only take a few hours to make. The sample is made in soft, sturdy and bulky Quince and Co. Puffin.
Abbreviations
This is a list of common abbreviations and stitches I use in my patterns: refer to it if an abbreviation has you stumped or you just want to double-check to make sure you're doing a decrease correctly.
| * | repeat from * to current place in row |
| [ ] and ( ) | repeat instructions in brackets or parentheses as designated |
| approx. | approximately |
| beg | begin(ning) |
| bm | before marker |
| BO | bind off (cast off) |
| Cdd | center double decrease: Sl 2 sts tog k-wise, k1, pass 2 sl sts over |
| CC | contrasting color (refer to yarn requirements) |
| cm | centimeter |
| cn | cable needle |
| CO | cast on |
| cont | continue(ing) |
| dec | decrease(ing) |
| dpn | double point(ed) needle |
| foll | follow(ing) |
| g | gram(s) |
| gs (garter stitch) | If working flat, knit every row. If working in the round, K 1 rnd, p 1 rnd. |
| in | inch(es) |
| inc | increase(ing) |
| k | knit |
| k-wise | knit-wise |
| k2tog | knit 2 stitches together |
| k3tog | knit 3 stitches together |
| kbf | knit into back and front of same stitch |
| kfb | knit into front and back of same stitch |
| LH | left hand |
| LLI | Knit into stitch 2 rows below stitch on RH needle |
| m | meter(s) or marker |
| M1 | Pick up strand between sts from back to front with LH ndl, knit this strand. |
| M1R | Pick up strand between sts from back to front with LH ndl, knit this strand. |
| M1L | Pick up strand between sts from front to back with LH ndl, knit this strand tbl. |
| M1P | Pick up strand between sts from back to front with LH ndl, purl this strand. |
| MC | main color (refer to yarn requirements) |
| ndl | needle(s) |
| oz | ounces |
| p | purl |
| p2tog | purl two stitches together |
| patt | pattern(s) |
| pfb | purl into front and back of same stitch |
| pm | place marker |
| psso | pass slipped stitch(es) over |
| p-wise | purl-wise |
| Rep(s) | repeat(s) |
| RH | right hand |
| RLI | Knit into stitch 1 row below next st on LH needle |
| Rnd(s) | Round(s) |
| RS | Right Side of work |
| s2kp | slip 2 stitches together k-wise, k1, pass the 2 slipped stitches over |
| sk2p | slip 1 st p-wise, k2tog, pass the slipped st over |
| sl | slip |
| sm | slip marker |
| St st | Stockinette stitch (stocking stitch) |
| st(s) | stitch(es) |
| ssk | slip next 2 sts separately k-wise, sl these sts back to LH needle and k2tog through back loops |
| ssp | slip next 2 sts separately k-wise, sl these sts back to LH needle and p2tog through back loops |
| tog | together |
| tbl | through the back of the loop(s) |
| w&t | wrap and turn. See Knitting Help for more information. |
| WS | wrong side (private side) of work |
| wyib | with the yarn in back |
| wyif | with the yarn in front |
| yo | yarn over needle (lace increase) |
| yd | yard(s) |
Saturday, 19 November 2011
Twist Collective: Darlington
I'm currently enjoying the weather and the company in beautiful (and cold) Washington State as I spend Thanksgiving with my family. Adding to that, I'm ecstatic to be featured in the newest issue of Twist Collective.

| ||||
| Photo credit: Jane Heller, Twist Collective |
| ||
| Photo credit: Jane Heller, Twist Collective |
I also made my own pair (in Size Large) from some handspun I made from gorgeous Oatmeal BFL. They have been my constant companions this Winter.

The pattern is available for $6.00 from the Twist Collective. Or Ravel it.
Monday, 14 November 2011
Gismonda Tutorial: 4 st Decrease
I found myself in possession of a tripod this weekend, and various other tools that allowed me to finally fulfill my commitment to immortalizing this stitch (for Gismonda) in pictures. Kristen has very, very patiently waited for this, so I hope you find it useful, Kristen!
This stitch is a series of passing knit stitches over each other, then decreasing the final resulting knit stitch into the preceding purl stitch to make the results virtually invisible (at least, as invisible as you can get).
This stitch is a series of passing knit stitches over each other, then decreasing the final resulting knit stitch into the preceding purl stitch to make the results virtually invisible (at least, as invisible as you can get).
 |
| You start with 1 purl st and the 4 knit stitches you're going to decrease on your left-hand needle. The yarn is to the back of the work. |
 |
| Slip the next 2 sts (the purl st and the first knit st) purl-wise, keeping the yarn at the back. |
 |
| Then, you use the tip of the right-hand needle to slip the second st on the left-hand needle... |
 |
| ...over the first st on the left-hand needle. That's one st decreased. |
 |
| Slip that resulting st from the left-hand needle back to the right-hand needle. Note that the working yarn isn't being used right now, so is still being held at the back of the work. |
 |
| Now pass the second st on the right-hand needle over the first st on the right-hand needle, decreasing another stitch. |
 |
| And slip that resulting st back to the left-hand needle. |
 |
| Then slip the second st on the left-hand needle over the first again, like you did with the first decrease. You've decreased 3 sts so far. |
 | ||||
| And it will look like this! All that is is the side sts of the cable passed over a (somewhat) center stitch. |
 |
| Slip that first purl st from the right-hand needle to the left-hand needle so it sits next to the decreased clump of knit stitches. |
 |
| Bring the yarn to the front |
 |
| and purl those stitches together. |
 |
| And you're done! Decrease completed. You can carry on with your reverse stockinette stitch. |
Saturday, 24 September 2011
Sale!
I have a few more things coming up on this oft-neglected blog, including a tutorial for those trick decreases in Gismonda, but as I wait on a second pair of hands, I'll brighten what can be a somewhat dim nearly-fall day with a sale!
Until midnight GMT on Sunday (that's tomorrow, folks!), I'm offering 25% off all individual patterns and 10% off all (already discounted) collections (Gwynedd and Light and Shade) in my Ravelry Store.
That's Lady of the Blue Forest for £2.25 and the whole collection of 8 patterns in Light and Shade for £10.80!

Happy shopping!
Until midnight GMT on Sunday (that's tomorrow, folks!), I'm offering 25% off all individual patterns and 10% off all (already discounted) collections (Gwynedd and Light and Shade) in my Ravelry Store.
That's Lady of the Blue Forest for £2.25 and the whole collection of 8 patterns in Light and Shade for £10.80!

Happy shopping!
Tuesday, 2 August 2011
Technique Tuesday: Finishing
Something I always struggled with when I first started to knit (and let's face it, some things still befuddle me), is finishing techniques. Seaming and weaving in ends were never my friends. My seams were always too bulky, and my ends always worked their ways to the front of the fabric and waved at me like little flags, always there to signal my failure at finishing.
Fortunately, a few very gracious people are out there to help people like me!
The Purl Bee posted this great photo tutorial on weaving in ends in all sorts of different ways, so you can find which is best for your project:
And Sandi Rosner of Twist Collective seems to have written this article on seams directly for me. I'll definitely have it close at hand once I go to sew up my next non-seamless garment (which might not be for a while, but she's made me brave!).
Now to suck it up and learn how to steek...
Fortunately, a few very gracious people are out there to help people like me!
The Purl Bee posted this great photo tutorial on weaving in ends in all sorts of different ways, so you can find which is best for your project:
 |
| The Duplicate Stitch Way |
And Sandi Rosner of Twist Collective seems to have written this article on seams directly for me. I'll definitely have it close at hand once I go to sew up my next non-seamless garment (which might not be for a while, but she's made me brave!).
 |
| Amazing |
Tuesday, 12 July 2011
Oatmeal Chocolate Raisin Cookies for British Bakers
I was basically raised on cookies (if you see early pictures of me, you can probably tell), and on this recipe in particular. Americans will probably recognize it as the recipe on the box/tin/bag of Quaker Oats. It's a wonderful mixture of oats and brown sugar and - with my additions - chocolate and raisins that is wonderfully hearty and just simply wonderful. It was my go-to cookie recipe, until I moved to the UK.
Every time I tried to replicate the recipe here in Britain, it never turned out right. The cookies just turned out really, really flat and with a bit of a greasy sheen, which I knew, from experience, wasn't right.
It wasn't until I was doing some research last night that I stumbled across people who actually knew something about baking and I discovered that, despite what everyone and everything tells you, all-purpose flour and plain flour are not the same. They should be perfectly interchangeable for cakes, bar cookies and quick breads, but when it comes to drop cookies and American recipes, you'll want to do something else.
If you're in the UK and are trying an American drop cookie recipe, use at least half and half of (Strong) White Bread Flour and Plain Flour to substitute for all purpose, or add an extra 25% of plain flour on top of what the recipe suggests for all-purpose. Plain flour doesn't have enough protein (gluten) to counteract all the other ingredients recommended in American recipes, and protein is what holds everything together. The gluten in plain flour is lower than in all-purpose, and this really shows when my drop cookies end up like greasy oatmeal paper instead of the little hills of heaven that they should be. Like these. Yum.

Every time I tried to replicate the recipe here in Britain, it never turned out right. The cookies just turned out really, really flat and with a bit of a greasy sheen, which I knew, from experience, wasn't right.
It wasn't until I was doing some research last night that I stumbled across people who actually knew something about baking and I discovered that, despite what everyone and everything tells you, all-purpose flour and plain flour are not the same. They should be perfectly interchangeable for cakes, bar cookies and quick breads, but when it comes to drop cookies and American recipes, you'll want to do something else.
If you're in the UK and are trying an American drop cookie recipe, use at least half and half of (Strong) White Bread Flour and Plain Flour to substitute for all purpose, or add an extra 25% of plain flour on top of what the recipe suggests for all-purpose. Plain flour doesn't have enough protein (gluten) to counteract all the other ingredients recommended in American recipes, and protein is what holds everything together. The gluten in plain flour is lower than in all-purpose, and this really shows when my drop cookies end up like greasy oatmeal paper instead of the little hills of heaven that they should be. Like these. Yum.

Oatmeal Chocolate Raisin Cookies for British Bakers
225g butter, softened
200g soft brown sugar
110g granulated sugar
2 eggs
1 tsp vanilla (licking any spilled bourbon-based vanilla extract from your hand is not recommended)
85g plain flour
85g strong white flour
1 tsp bicarbonate of soda
1/4 tsp salt (use 1/2 tsp if using unsalted butter)
270g porridge oats (I prefer traditional cut)
250g of chocolate covered raisins (I prefer these to chocolate chips, as many British chocolate chips are too small and often get lost in these cookies)
Preheat oven to 180° C.
Beat butter and sugars together. Add eggs and vanilla and stir until well-combined.
Mix in flours, bicarbonate of soda, and salt, then the oats and chocolate covered raisins. Form cookies into small balls (I use a small ice cream scoop with a release lever), place on baking paper on tray, and bake for 10-12 minutes. Let cool for a few minutes before moving them to the cooling rack so they don't fall apart.
Thanks to the internet for the help in achieving my dream cookie in the UK!
Subscribe to:
Posts (Atom)